Beginner Tutorial: Basic Placement
This tutorial uses the ready made managers from ARDK to create a simple example that lets you place objects on the floor or wall.
ARDK provides a number of managers that encapsulate the start up and configuration of features. This example uses the Placement Manager and a few other helpers.
For this to work you need to have imported the ARDK examples package (at least the common section)
Note
The mocking system demonstrated in the video has been updated in ARDK 1.3. For details on mock mode changes see the additional Mock Mode video.
Preparation
This tutorial assumes you have a working Unity scene where you have imported the ARDK & ARDK-examples packages, and configured the project to run on a device. If you haven’t already imported the packages, in your project view:
Right-click the Asset folder > Import Package> Custom Package> select the ARDK package you downloaded > Import All
Right-click the Asset folder > Import Package> Custom Package> select the ARDK-examples package you downloaded > Import All
Update the build and player settings for building Android or iOS.
Please refer to the Getting Started With ARDK page for more details.
Steps
Create a new scene.
In the Scenes section of the Project view, create a folder (right-click Create > Folder) and call it “placement”.
In that folder create a new scene (right-click Create > Scene) and call it “PlacementTutorial”.
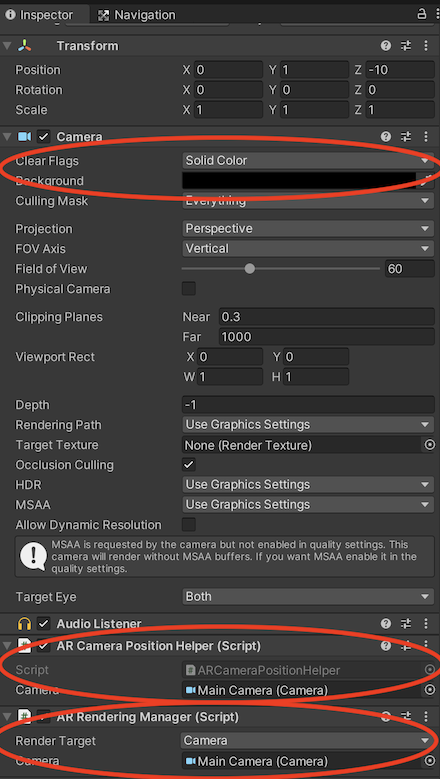
Setup the camera.
Add the ARCameraPositionHelper component to the camera.
Add the ARRenderingManager to the camera.
In the components you just added, set the Camera variable to the Main Camera.
Change the camera’s background to a solid color and make it black.
Make sure that the camera is set on all of the Position helpers and rendering managers.
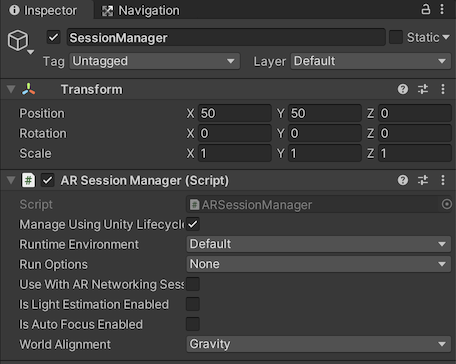
Add a session manager. The Session Manager will take care of setting up our AR session.
Add an empty game object to your scene and call it Session Manager.
Add the Session Manager script component to your session manager. Click on Add Component and search for “ARSessionManager”.
Note
Quite often you will see scenes with a session manager as the parent of the camera in the scene. The relationship is not required, and you are free to set your scene hierarchy up however you want.
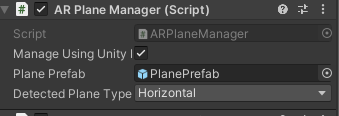
Add in the Plane Manager so we can place objects.
Add the AR Plane Manager script component to the Session Manager. Click on Add Component and search for “ARPlaneManager”. This manager contains all the logic needed to store and track AR objects in the scene. This manager also provides the following functionality:
This manager enables plane-based placement.
It contains a dictionary to store the locations of items placed in the AR space
It adds hooks for the On Anchor Placed/Updated events to manage and update item placement, keeping them pinned to the world. In short it catches all placement events and makes sure things stay where they are by updating object transforms as the world updates.
Once you are more familiar with ARDK you can start to look at how ARPlaneManager does these things, but for now we will just use it as is.
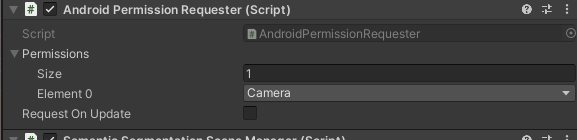
Set up camera permissions for Android.
If you’re developing for Android, add the Android Permissions helper to your Session Manager. Set Size to 1, and make sure Camera is in the drop down. This ensures the app asks the user for permission to use the camera at run-time.
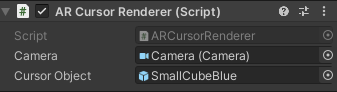
Add the AR Cursor Renderer Script as a component to the Session Manager Object.
Click Add Component and search for AR Cursor Renderer. Note that this component is in the ARDK-Examples package. This component adds & updates a small cube on the ground that is positioned in a straight line out from the camera. To do this, it hooks into the ARSession start up and adds a callback to its FrameUpdated event. Every frame it performs a hit test against the ARFrame using a line projected out of the camera’s forward vector. If it detects a hit, it will move a small cube to the hit location.
Make sure you set the Camera field on AR Cursor Renderer to the scene camera
Select an object to be the 3d cursor. Click in Cursor Object and then select the Assets tab and search for small cube.
Note
If searching for a component/script fails you can manually drag the script onto the object or try saving and restarting Unity as it may not have updated its search DB when the examples package was imported
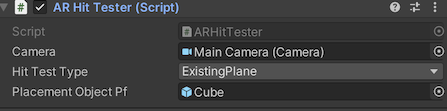
Add the AR Hit Tester as a component to the Session Manager object.
This script will process user screen touches and place a prefab at that location on the plane. This hooks into the SessionInitialized event and then stores a reference to the ARSession. In its update loop it checks for a touch event. If that happens it does a hit test at that 2d point to see if there is an intersection with the current AR frame. If so it will place a prefab into the scene at that location. You can use any prefab you like. For this tutorial we have just used a cube but you could place a character etc.
Make sure you set the Camera field to the scene camera.
Note
The placement code may result in a floating object as it assumes a unit cube. Once you are more familiar with ARDK you can come back and swap this part of the code with the code for the hit test in the Cursor Renderer Script.
Run in the Unity editor.
At this point if you run the project in the editor there is nothing to see beyond just a sky dome. In the next step we’ll set up our mocking system so that we have some editor geometry to test with before moving to building and running on a phone.

Set up the mocking system.
Download the ARDK Mock Environments package from the ARDK Downloads page and import the package into your Unity project.
In the Lightship > ARDK > Virtual Studio window, go to the Mock tab and select the “LivingRoom” prefab from the Mock Scene dropdown. The prefab will automatically be instantiated in your scene when you run in the Unity editor.
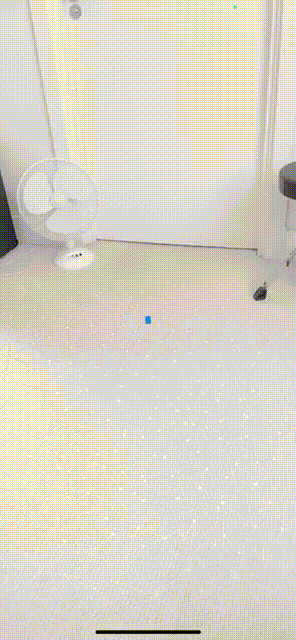
Run in the Unity editor with the mock scene. We now see our scene with an overlaid effect for the planes that we can place objects on. If we click on any surface our game object will be placed there.
Run on your device.
For iOS:
File > Build & Run. This will build and then launch XCode with a iOS project for your Unity app.
In XCode, build and run on your device.
For more details on building and running on iOS, see: Building for iOS.
For Android:
File > Build & Run. This will start the app on your connected Android device.
If your screen is blank, some phones require setting Blit Type to Auto. In File> Build Settings, click Player Settings and under Resolution and Presentation set Blit Type to Auto.
For more details on building and running on Android, see: Building for Android.
Troubleshooting black screen or other issues
Check that you have followed the basic setup guide, this covers application signing and permissions which are the most likely issues.
If the application is crashing or not working as expected (no camera output) check that you have actually set all of the variables like
CameraandPrefabon your game object.This tutorial uses some of the components in the ARDK-Examples package so make sure to import that too.