Beginner Tutorial: Semantic Texture Using CopyToAligned
Note
The mocking system demonstrated in the video has been updated in ARDK 1.3. For details on mock mode changes see the additional Mock Mode video.
In order to use ARDK’s depth and semantic buffers they need to be aligned to the screen. The most efficient way to do this is with a shader as covered in the Intermediate Tutorial: Depth Textures and Intermediate Tutorial: Semantic Segmentation Textures tutorials.
However, if you are not ready to start writing shaders and want pass the depth buffer or a particular semantic channel into an effect you have downloaded then you can use the CopyToAligned helper functions. These functions are CPU side functions that give you a texture that is rotated and aligned to the screen. Using these functions will perform slower than using a shader, but they are more straight-forward to use than writing custom shaders.
To demonstrate this, we will get one of the semantic channels and display it in a Unity raw image.
Preparation
This tutorial assumes you have a working Unity scene where you have imported the ARDK & ARDK-examples packages, and configured the project to run on a device. If you haven’t already imported the packages, in your project view:
Right-click the Asset folder > Import Package> Custom Package> select the ARDK package you downloaded > Import All
Right-click the Asset folder > Import Package> Custom Package> select the ARDK-examples package you downloaded > Import All
Update the build and player settings for building Android or iOS.
Please refer to the Getting Started With ARDK page for more details.
Steps
Create a new scene.
Create a new folder in your
Assettree calledCopyToAlignedTutorial.Create a new scene in that folder. Right-click in the folder and select Create > Scene. Name it
CopyToAlignedTutorial.
Add the ARDK Managers.
Add the following ARDK components to your scene camera:
AR Session Manager
AR Camera Position Helper
AR Rendering Manager
Semantic Segmentation Manager
Make sure that the camera is set on all of the managers.
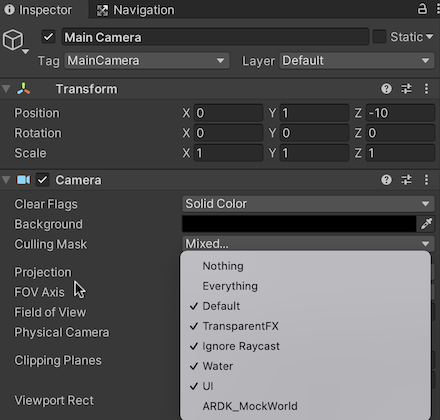
Update the camera settings.
Make sure to set the camera’s background to black.
Set Culling Mask to ignore the ARDK mock world.
Add in the mock scene so you can test in Unity.
When we’re testing our Unity project in the Unity editor, and not on a device, we’ll use Playing in Mock Mode to simulate an environment with semantic channels.
Download the ARDK Mock Environments package from the ARDK Downloads page.
Import the package into your Unity project.
In the Lightship > ARDK > Virtual Studio window, go to the Mock tab and select the
ParkPondprefab from the Mock Scene dropdown. This mock environment has a skybox object set to use the “Sky” semantic channel. The prefab will automatically be instantiated in your scene when you run in the Unity editor.
Create a script to catch the semantic update callback.
Create a
CopyToAlignedTutorialscript in the same folder as your scene.Add the script to the camera.
Pass in the
Segmentation Managerto the script’s segmentation manager field.
Our
CopyToAlignedTutorialscript:using System.Collections; using System.Collections.Generic; using Niantic.ARDK; using Niantic.ARDK.AR; using Niantic.ARDK.Extensions; using Niantic.ARDK.AR.ARSessionEventArgs; using Niantic.ARDK.AR.Configuration; using Niantic.ARDK.AR.Awareness; using Niantic.ARDK.AR.Awareness.Semantics; using UnityEngine; using UnityEngine.UI; public class CopyToAlignedTutorial : MonoBehaviour { //pass in our semantic manager public ARSemanticSegmentationManager _semanticManager; void Start() { //add a callback for catching the updated semantic buffer _semanticManager.SemanticBufferUpdated += OnSemanticsBufferUpdated; } //will be called when there is a new buffer private void OnSemanticsBufferUpdated(ContextAwarenessStreamUpdatedArgs<ISemanticBuffer> args) { } }
Update OnSemanticsBufferUpdated to copy the sky channel into an aligned texture 2d.
You will use a
RawImageto display it:public RawImage _overlayImage; Texture2D _semanticTexture; private void OnSemanticsBufferUpdated(ContextAwarenessStreamUpdatedArgs<ISemanticBuffer> args) { //get the buffer that has been surfaced. ISemanticBuffer semanticBuffer = args.Sender.AwarenessBuffer; //ask for a mask of the sky channel int channel = semanticBuffer.GetChannelIndex("sky"); _semanticManager.SemanticBufferProcessor.CopyToAlignedTextureARGB32 ( texture: ref _semanticTexture, channel: channel, orientation: Screen.orientation ); _overlayImage.texture = _semanticTexture; }
Add in a RawImage to your scene and pass it to your script.
Right click the hierarchy and add in a Raw Image.
Set it up to cover the entire screen by selecting stretch for height and width and then zeroing out the Left, Top, Pos Z, Right, and Bottom values.
Pass the RawImage to the script’s Overlay Image field.
Test in editor.
You should see the skybox in the mock environment now highlighted in white.